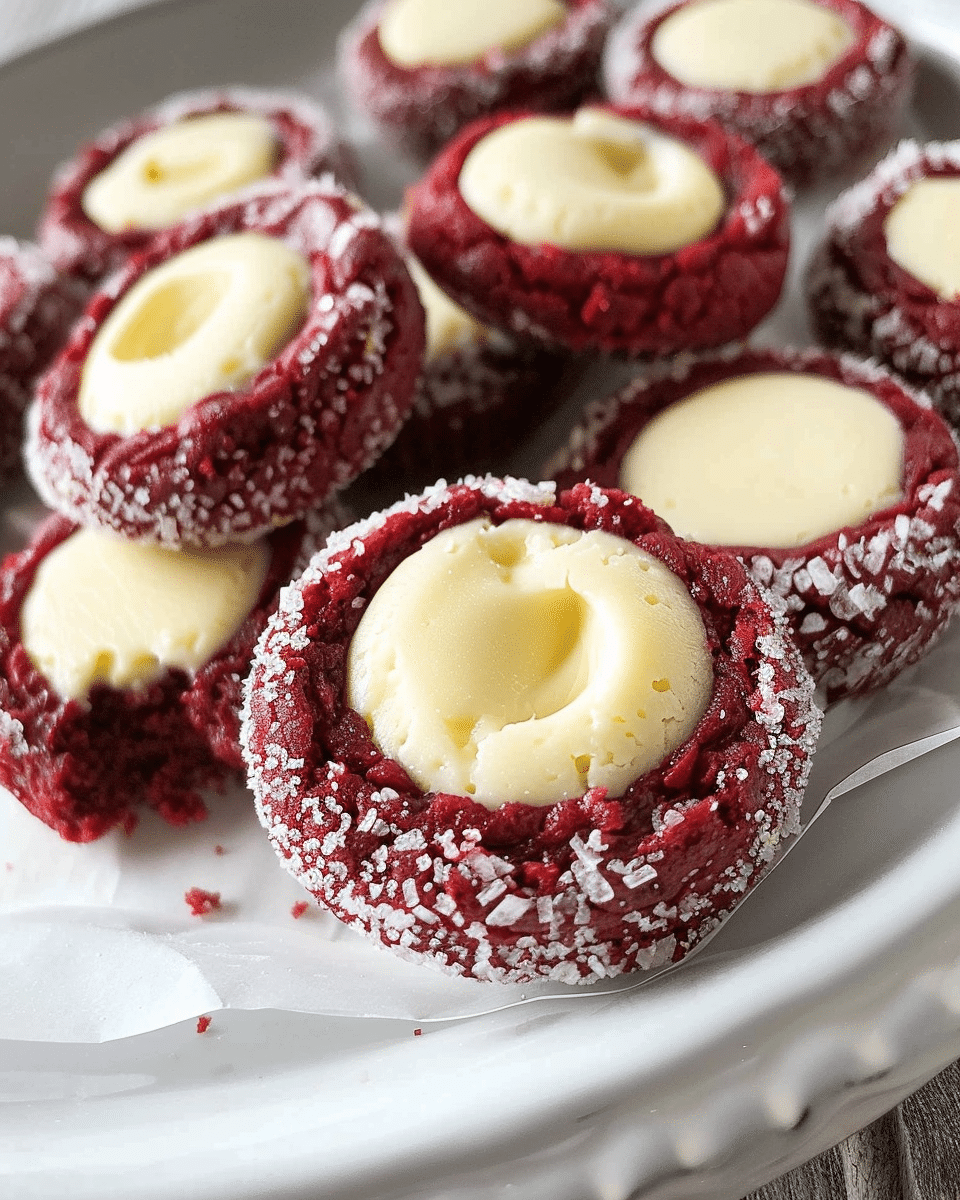
Red Velvet Cheesecake Thumbprints are a delectable treat that combines the best of two iconic desserts—red velvet cookies and creamy cheesecake. These cookies, with their rich flavor and striking color, are a perfect choice for special occasions like Oscar Night or Valentine’s Day. The smooth, tangy cheesecake center nestled in the heart of each red velvet cookie creates a sweet and satisfying bite every time. Let’s dive into this recipe that brings both a touch of elegance and indulgence to any gathering.
Why You’ll Love This Recipe
Red Velvet Cheesecake Thumbprints offer the ultimate combination of rich, chocolatey red velvet cookies paired with a creamy cheesecake filling. The contrast in texture—crisp sugar-coated dough with a soft, tangy cheesecake center—is a delightful experience for the taste buds. Plus, the vibrant red color makes these cookies visually striking, perfect for themed events or celebrations. Whether you’re preparing for a movie night, a holiday, or a special occasion, these cookies will be the star of the show!
Ingredients
For the Cookie Dough:
-
2 3/4 cups all-purpose flour
-
1/2 cup natural unsweetened cocoa powder (not Dutch process)
-
1 teaspoon baking powder
-
1/2 teaspoon Kosher or sea salt
-
1/2 cup unsalted butter, softened to room temperature
-
4 ounces (1/2 brick) full-fat brick-style cream cheese, softened to room temperature
-
1 cup granulated sugar
-
1 large egg + 1 large egg yolk, room temperature
-
1 1/2 teaspoons white vinegar (or apple cider vinegar)
-
2 teaspoons pure vanilla extract
-
1 teaspoon red gel food coloring
For the Cheesecake Filling:
-
4 ounces (1/2 brick) full-fat brick-style cream cheese, softened to room temperature
-
2 tablespoons granulated sugar
-
1 large egg yolk, room temperature
-
1/2 teaspoon pure vanilla extract
For Rolling:
-
1/4 cup granulated sugar
(Tip: You’ll find the full list of ingredients and measurements in the recipe card below.)
Directions
-
In a large mixing bowl, whisk together flour, cocoa powder, baking powder, and salt. Set aside.
-
In a separate bowl, use an electric mixer to beat butter and cream cheese until light and fluffy, about 2 minutes. Add granulated sugar and beat until smooth. Add the egg, egg yolk, vinegar, vanilla extract, and gel food coloring. Mix until combined.
-
Gradually add the dry ingredients in three installments, mixing thoroughly after each addition. Once combined, divide the dough into quarters and wrap each in plastic wrap. Chill for at least 3 hours, or up to 3 days.
-
Preheat the oven to 300°F and line two baking sheets with parchment paper.
-
For the cheesecake filling: Beat cream cheese with an electric mixer until fluffy. Add sugar, egg yolk, and vanilla extract, mixing until smooth. Transfer to a piping bag or zip-top sandwich bag and set aside.
-
Place the rolling sugar in a small bowl. Scoop dough by the tablespoon and roll into balls. Roll each ball in sugar and place on the baking sheets, spacing at least 2 inches apart. Use the back of a rounded 1/2 teaspoon measure to press a well into the center of each dough ball.
-
Bake the cookies for 10 minutes. Remove from the oven, and carefully deepen the wells with the back of a 1 teaspoon measure. Pipe the cheesecake filling into each well. Tap the pans on the counter to release any air bubbles.
-
Bake for an additional 10 minutes, until the cheesecake is set and slightly puffed. Allow cookies to cool on the baking sheets for 10 minutes before transferring to a cooling rack. The cheesecake will deflate slightly as it cools.
-
Let the cookies cool to room temperature before refrigerating for at least 45 minutes to allow the cheesecake to chill.
Servings and Timing
-
Servings: This recipe yields approximately 3.5 dozen cookies.
-
Prep Time: 20 minutes (excluding chilling time)
-
Cook Time: 20 minutes (baking in two stages)
-
Chilling Time: At least 45 minutes before serving
Variations
-
Flavor Twist: Add a teaspoon of lemon zest or orange zest to the cheesecake filling for a citrusy kick.
-
Different Colors: If you prefer a different color for special occasions, you can swap the red food coloring for another shade, like pink for Valentine’s Day.
-
Gluten-Free Version: Substitute the all-purpose flour with a gluten-free flour blend to make this recipe gluten-free.
Storage/Reheating
-
Storage: Store the cookies in an airtight container in the refrigerator for up to 5 days.
-
Reheating: These cookies are best served chilled, so there’s no need to reheat. However, if you prefer to enjoy them at room temperature, simply let them sit out for a few minutes before serving.
FAQs
How long do Red Velvet Cheesecake Thumbprints need to chill?
The dough should chill for at least 3 hours before baking, and the cookies need to be refrigerated for 45 minutes after baking to set the cheesecake filling.
Can I freeze Red Velvet Cheesecake Thumbprints?
Yes, you can freeze the cookies. Once fully cooled, place them in an airtight container or a freezer-safe bag and freeze for up to 3 months.
Can I use store-bought cream cheese for the filling?
Yes, store-bought cream cheese works fine, but be sure to use the brick-style, not the spreadable kind, for a firmer texture.
How can I prevent the dough from cracking when pressing it?
If the dough cracks, simply pinch it back together gently with your fingers. Make sure to roll the dough balls tightly before pressing.
Do I have to roll the cookies in sugar?
No, but rolling the dough in sugar adds a delightful crunch and sparkle to the cookies, which is perfect for special occasions.
Can I use a different type of food coloring?
Yes, you can experiment with other gel food coloring if you prefer a different color for your cookies.
Why do I need to press the dough with a spoon?
Using a spoon ensures the wells in the dough are the right size for holding the cheesecake filling. It also prevents a messy thumbprint.
How do I know when the cheesecake filling is set?
The cheesecake filling will be slightly puffed and firm to the touch after the second round of baking. It should not jiggle when you move the pan.
Can I use other types of vinegar in the dough?
While white vinegar is commonly used in red velvet recipes, apple cider vinegar can be a good substitute for a slightly different flavor.
How do I make sure the cheesecake filling stays in place?
Carefully pipe the filling into the wells, and then gently tap the pan to release any large air bubbles. This will help the filling stay in place as it bakes.
Conclusion
Red Velvet Cheesecake Thumbprints are a show-stopping treat that combines the elegance of red velvet with the creamy decadence of cheesecake. Whether you’re preparing them for a special event or just as a treat for yourself, these cookies offer a perfect balance of flavors and textures. With their striking color, rich flavor, and irresistible cheesecake filling, they’re sure to be a hit at any gathering.
Red Velvet Cheesecake Thumbprints
5 Stars 4 Stars 3 Stars 2 Stars 1 Star
No reviews
- Author: Alice
- Total Time: At least 4 hours (including chilling time)
- Yield: Approximately 3.5 dozen cookies
- Diet: Vegetarian
Description
Red Velvet Cheesecake Thumbprints are a delectable treat combining rich red velvet cookies and a creamy cheesecake filling. With their striking color and satisfying texture, these cookies are perfect for special occasions like Valentine’s Day or Oscar Night.
Ingredients
2 3/4 cups all-purpose flour
1/2 cup natural unsweetened cocoa powder (not Dutch process)
1 teaspoon baking powder
1/2 teaspoon Kosher or sea salt
1/2 cup unsalted butter, softened to room temperature
4 ounces (1/2 brick) full-fat brick-style cream cheese, softened to room temperature
1 cup granulated sugar
1 large egg + 1 large egg yolk, room temperature
1 1/2 teaspoons white vinegar (or apple cider vinegar)
2 teaspoons pure vanilla extract
1 teaspoon red gel food coloring
4 ounces (1/2 brick) full-fat brick-style cream cheese, softened to room temperature (for the filling)
2 tablespoons granulated sugar (for the filling)
1 large egg yolk (for the filling)
1/2 teaspoon pure vanilla extract (for the filling)
1/4 cup granulated sugar (for rolling)
Instructions
- In a large mixing bowl, whisk together flour, cocoa powder, baking powder, and salt. Set aside.
- In a separate bowl, use an electric mixer to beat butter and cream cheese until light and fluffy, about 2 minutes. Add granulated sugar and beat until smooth. Add the egg, egg yolk, vinegar, vanilla extract, and gel food coloring. Mix until combined.
- Gradually add the dry ingredients in three installments, mixing thoroughly after each addition. Once combined, divide the dough into quarters and wrap each in plastic wrap. Chill for at least 3 hours, or up to 3 days.
- Preheat the oven to 300°F and line two baking sheets with parchment paper.
- For the cheesecake filling: Beat cream cheese with an electric mixer until fluffy. Add sugar, egg yolk, and vanilla extract, mixing until smooth. Transfer to a piping bag or zip-top sandwich bag and set aside.
- Place the rolling sugar in a small bowl. Scoop dough by the tablespoon and roll into balls. Roll each ball in sugar and place on the baking sheets, spacing at least 2 inches apart. Use the back of a rounded 1/2 teaspoon measure to press a well into the center of each dough ball.
- Bake the cookies for 10 minutes. Remove from the oven, and carefully deepen the wells with the back of a 1 teaspoon measure. Pipe the cheesecake filling into each well. Tap the pans on the counter to release any air bubbles.
- Bake for an additional 10 minutes, until the cheesecake is set and slightly puffed. Allow cookies to cool on the baking sheets for 10 minutes before transferring to a cooling rack. The cheesecake will deflate slightly as it cools.
- Let the cookies cool to room temperature before refrigerating for at least 45 minutes to allow the cheesecake to chill.
Notes
- Add a teaspoon of lemon or orange zest to the cheesecake filling for a citrusy twist.
- If you don’t want to roll the cookies in sugar, you can skip that step, but it adds a delightful crunch and sparkle.
- To make gluten-free, substitute the all-purpose flour with a gluten-free flour blend.
- For a different color, you can swap the red food coloring for another color like pink for Valentine’s Day.
- Store the cookies in an airtight container in the refrigerator for up to 5 days.
- If freezing, store cooled cookies in an airtight container or freezer-safe bag for up to 3 months.
- Prep Time: 20 minutes (excluding chilling time)
- Cook Time: 20 minutes (baking in two stages)
- Category: Dessert
- Method: Baking
- Cuisine: American
Nutrition
- Serving Size: 1 cookie
- Calories: 160
- Sugar: 14g
- Sodium: 50mg
- Fat: 8g
- Saturated Fat: 4g
- Unsaturated Fat: 4g
- Trans Fat: 0g
- Carbohydrates: 20g
- Fiber: 1g
- Protein: 2g
- Cholesterol: 30mg

