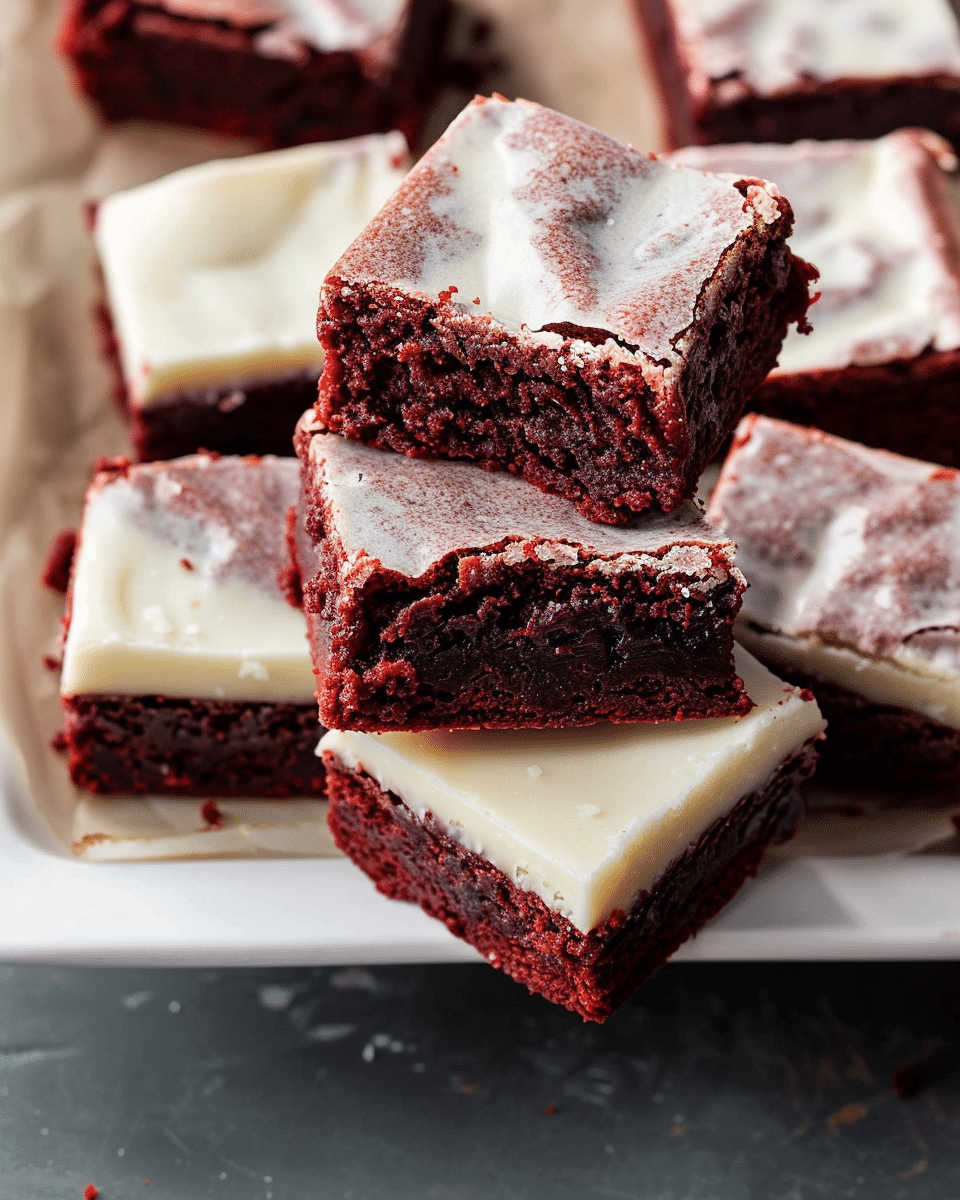
These Red Velvet Brownies are an irresistible treat with a soft, chewy texture and a stunning red hue. Topped with smooth cream cheese frosting, they combine the rich flavors of red velvet cake with the indulgence of a brownie. Whether you’re craving a dessert to impress guests or simply want a delicious sweet bite, these brownies will do the trick. You can even make them dairy-free for those with dietary restrictions, making them an inclusive and delightful option for any occasion.
Why You’ll Love This Recipe
I absolutely love these Red Velvet Brownies because they offer the best of both worlds: the dense, fudgy texture of a brownie and the iconic, vibrant red velvet flavor. The addition of cream cheese frosting on top elevates them even further, creating a perfect balance of tangy and sweet. Plus, the option to make them dairy-free ensures that everyone can enjoy these beauties. I can easily whip these up in under an hour, and they’re always a hit at gatherings, family dinners, or just as a special treat for myself!
Ingredients
For the Brownies:
-
¾ cup butter, melted (regular or dairy-free)
-
¾ cup light brown sugar
-
1 cup granulated sugar
-
2 eggs
-
1 tablespoon vanilla extract
-
½ teaspoon liquid red food coloring
-
1 ½ teaspoon white vinegar
-
¼ cup cocoa powder
-
¼ teaspoon salt
-
1 cup + 3 tbsp all-purpose flour
For the Cream Cheese Frosting:
-
4 oz plain cream cheese, room temperature (or dairy-free cream cheese)
-
¼ cup butter, softened (dairy-free or regular)
-
½ teaspoon vanilla extract
-
Pinch of salt
-
1 ½-2 cups powdered sugar
-
2 tablespoons cornstarch (only if dairy-free cream cheese is used)
(Here’s a tip: Check out the full list of ingredients and measurements in the recipe card below.)
Directions
-
I preheat the oven to 350°F and line an 8×8 square baking pan with parchment paper. I make sure the parchment paper hangs over the sides for easy removal later.
-
I melt the butter in the microwave or on the stove, then transfer it to a medium-sized bowl.
-
In the bowl with the melted butter, I add both the light brown sugar and granulated sugar. Using a whisk, I mix everything together until the mixture resembles a thick paste that pulls away from the side of the bowl when whisked.
-
I add the eggs, vinegar, vanilla, and red food coloring to the bowl. After mixing, I adjust the color if necessary, adding a bit more food coloring to achieve the desired hue.
-
I pour in the dry ingredients: cocoa powder, salt, and flour. I whisk everything together until just combined. I avoid overmixing to ensure a tender texture.
-
I pour the batter into the prepared pan and use a spatula to scrape all of it into the corners.
-
I bake the brownies for 30-40 minutes. At 30 minutes, I check by inserting a toothpick into the middle. The top should be crinkly, and the toothpick should come out with a few moist crumbs, not wet batter. Over-baking will result in a tough texture, so I keep an eye on them.
-
While the brownies cool, I prepare the cream cheese frosting. In a medium bowl (or using a stand mixer), I beat the cream cheese, butter, salt, and vanilla extract until smooth and creamy.
-
I slowly add the powdered sugar until the frosting reaches the desired consistency. If I’m using dairy-free cream cheese, I add cornstarch to help thicken the frosting.
-
Once the brownies have cooled completely, I spread the frosting evenly over the top and cut them into squares.
Servings and Timing
-
Servings: 16 brownies
-
Prep time: 10 minutes
-
Bake time: 35 minutes
-
Total time: 45 minutes
Variations
I like to experiment with different variations for these Red Velvet Brownies:
-
If I want to make them extra indulgent, I’ve added chocolate chips to the brownie batter for an extra dose of decadence.
-
I’ve also swapped the cream cheese frosting for a simple chocolate ganache when I’m in the mood for a richer topping.
-
For a fun twist, I’ve topped the brownies with a sprinkle of crushed nuts or candy pieces for some crunch and visual appeal.
Storage/Reheating
These Red Velvet Brownies store beautifully, and I usually refrigerate them if they’re frosted. The frosting helps keep them fresh and moist. If I have any leftovers, I keep the brownies in an airtight container in the fridge for up to 3-4 days. I’ve also stored the cream cheese frosting separately in the fridge and frosted the brownies when I’m ready to serve them. If I need to reheat them, I warm them gently in the microwave for about 10-15 seconds for a soft, fudgy texture.
FAQs
Can I make these brownies dairy-free?
Yes! I’ve made these brownies dairy-free by using dairy-free butter and cream cheese. You can find plenty of dairy-free alternatives in stores, and they work just as well to create that rich, creamy frosting.
Can I use gel food coloring instead of liquid?
Yes, you can use gel food coloring if you prefer. Just keep in mind that gel coloring is more concentrated, so you’ll need a smaller amount to achieve the vibrant red hue.
How do I know when the brownies are done baking?
I check the brownies at 30 minutes by inserting a toothpick. When it comes out with a few wet crumbs but not wet batter, I know they’re done. The top should also have a crinkly appearance.
Can I freeze these brownies?
Yes, I’ve frozen these brownies with the frosting already applied, and they freeze beautifully. I wrap them tightly in plastic wrap and foil, then place them in an airtight container. They last for up to 3 months in the freezer.
Can I double the recipe?
Of course! If I want to make a larger batch, I double the ingredients and bake the brownies in a 9×13-inch pan for 20-35 minutes. The extra space in the larger pan means they might bake a little quicker, so I check them a bit earlier than usual.
Conclusion
These Red Velvet Brownies are the ultimate treat for anyone who loves rich, decadent desserts. With their soft, chewy texture and the irresistible combination of red velvet flavor topped with creamy frosting, they’re sure to become a favorite in my baking repertoire. Whether I’m making them for a special occasion or as a sweet everyday indulgence, they never fail to impress!
Red Velvet Brownies
5 Stars 4 Stars 3 Stars 2 Stars 1 Star
No reviews
- Author: Alice
- Total Time: 45 minutes
- Yield: 16 brownies
- Diet: Vegetarian
Description
Cheesecake Stuffed Red Velvet Cookies are a decadent treat that combines the classic red velvet cookie with a creamy cheesecake center. These cookies have a chewy texture with a tangy cheesecake filling in the center, making every bite a perfect balance of flavors. They’re visually stunning and a perfect indulgence for any occasion.
Ingredients
For the Brownies:
¾ cup butter, melted (regular or dairy-free)
¾ cup light brown sugar
1 cup granulated sugar
2 eggs
1 tablespoon vanilla extract
½ teaspoon liquid red food coloring
1 ½ teaspoon white vinegar
¼ cup cocoa powder
¼ teaspoon salt
1 cup + 3 tbsp all-purpose flour
For the Cream Cheese Frosting:
4 oz plain cream cheese, room temperature (or dairy-free cream cheese)
¼ cup butter, softened (dairy-free or regular)
½ teaspoon vanilla extract
Pinch of salt
1 ½-2 cups powdered sugar
2 tablespoons cornstarch (only if dairy-free cream cheese is used)
Instructions
- Preheat the oven to 350°F and line an 8×8 square baking pan with parchment paper.
- Melt the butter and whisk it with light brown sugar and granulated sugar until it forms a paste. Add the eggs, vanilla, vinegar, and food coloring. Mix until combined.
- Add the dry ingredients: cocoa powder, salt, and flour, and mix until just combined. Pour the batter into the prepared pan and spread evenly.
- Bake for 30-40 minutes, checking at 30 minutes by inserting a toothpick. The brownies should have a crinkly top and a few moist crumbs on the toothpick. Let cool.
- For the cream cheese frosting, beat together cream cheese, butter, salt, and vanilla until smooth. Gradually add powdered sugar until the desired consistency is reached. If using dairy-free cream cheese, add cornstarch to thicken.
- Once the brownies are completely cool, spread the frosting evenly over the top and cut into squares.
Notes
- If you want to make them extra indulgent, add chocolate chips to the brownie batter.
- For a twist, swap the cream cheese frosting with a simple chocolate ganache.
- Store leftovers in an airtight container in the fridge for up to 3-4 days. The frosting helps keep them moist.
- Prep Time: 25 minutes
- Cook Time: 30-40 minutes
- Category: Dessert
- Method: Baking
- Cuisine: American
Nutrition
- Serving Size: 1 brownie
- Calories: 250
- Sugar: 20g
- Sodium: 120mg
- Fat: 14g
- Saturated Fat: 8g
- Unsaturated Fat: 5g
- Trans Fat: 0g
- Carbohydrates: 30g
- Fiber: 1g
- Protein: 3g
- Cholesterol: 45mg

